Implement of a Secure System with RAID1, LVM and directory management on linux.
Objective
Develop a robust and secure storage system using RAID 1, Logical Volume Management (LVM), and establish a directory structure for public and private files in a Linux environment.
Prerequisite
- Have a VM running a linux distribution with 2 or more disks with the same capacity.
- Have mdadm and lvm2 libraries available.
1. Disk configuration
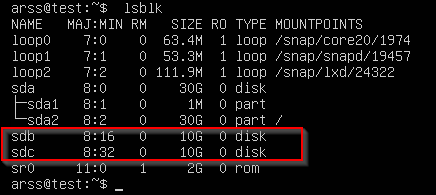
Check if the disks are attached.
1
lsblk
We are going to partition the disk with the default settings as it will take all the disk space.
1
2
3
4
5
fdisk /dev/sdb
--> n #for new
--> p #for a primary partition
--> #then we just press enter to select default configurations
--> w #for write the disk configuration
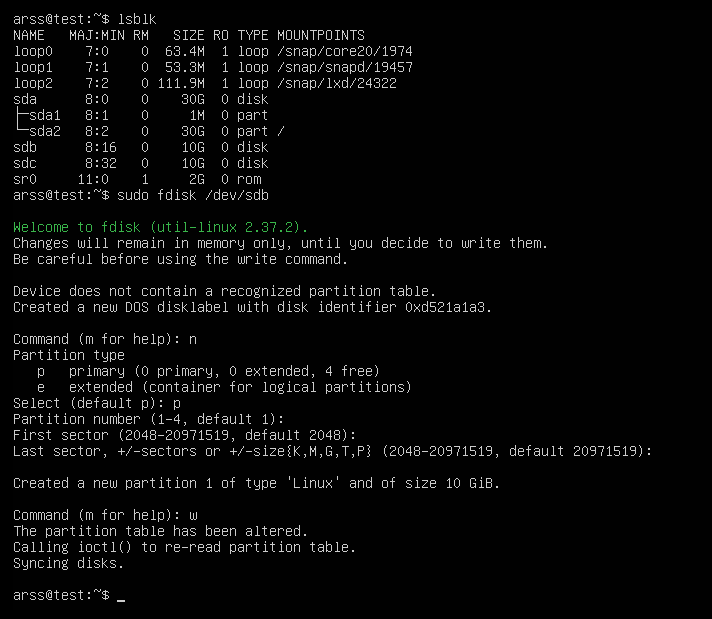
We will do the same for the next disk “/dev/sdc” Once we have partitioned both disk, typing “lsblk” will seems like this: 
2. RAID 1 Configuration
Configuration of RAID 1 to provide redundancy and fault tolerance.
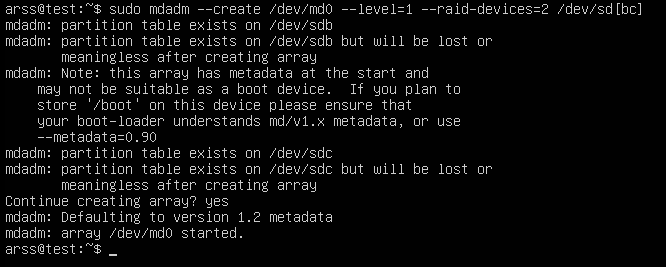
Now, typing the next command will create the RAID 1 using our two disks
1
mdadm --create /dev/md0 --level=1 --raid-devices=2 /dev/sd[bc]
mdadm: The command-line utility for managing Linux software RAID arrays.--create: Specifies that a new array should be created./dev/md0: Specifies the device name for the RAID array. You can choose a different name if needed.--level=1: Specifies the RAID level, in this case, it’s RAID 1, which is a mirrored array. Data is duplicated on each drive for redundancy.--raid-devices=2: Specifies the number of devices in the RAID array. In this case, there are two devices./dev/sd[bc]: Specifies the devices to be included in the RAID array. It uses a wildcard ([bc]) to represent/dev/sdband/dev/sdc. These two drives will be part of the RAID 1 array. Finally we have to validate we want to create it, we type yes.
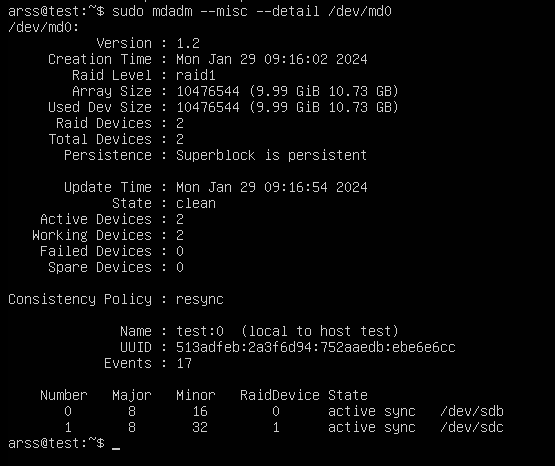
To check the status we can type:
1
mdadm --misc --detail /dev/md0
3. Creation of Physical Volume and Logical Group
Creation of a physical volume on RAID 1.
1
pvcreate /dev/md0

To check the status of the physical volume we can type:
1
pvdisplay

Establishment of a logical group named storage_group for flexible space management.
1
vgcreate storage_group /dev/md0

To check the status we can type the command:
1
vgdisplay

4. Creation of Logical Volumes
Creation of logical volumes public_lv and private_lv for efficient storage organization.
1
2
lvcreate --name public_lv --size 2Gb storage_group
lvcreate --name private_lv --size 2Gb storage_group
lvcreate: This is the command used to create a new logical volume.--name public_lv: Specifies the name of the logical volume to be created. In this case, it is namedpublic_lv.--size 2Gb: Specifies the size of the logical volume. The size is set to 2 gigabytes in this example. You can adjust the size based on your requirements.storage_group: Specifies the name of the volume group in which the logical volume should be created.

To check the status we can type:1
lvdisplay

5. File System and Mounting
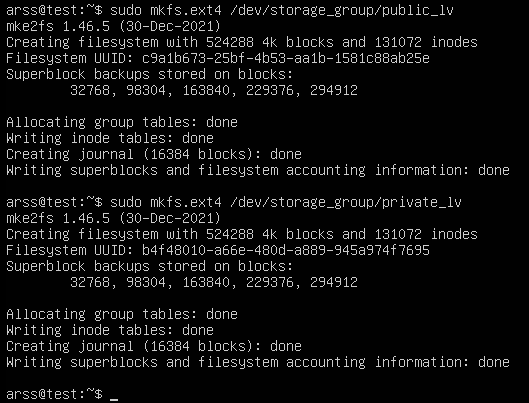
Formatting of logical volumes as file systems (e.g., ext4).
1
2
mkfs.ext4 /dev/storage_group/public_lv
mkfs.ext4 /dev/storage_group/private_lv
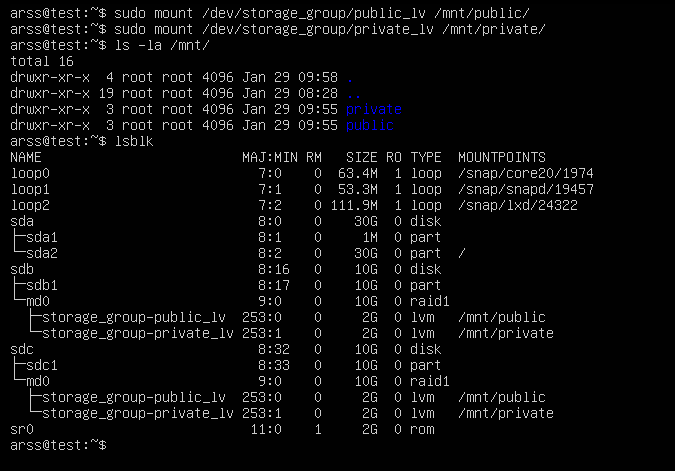
Mounting of logical volumes in specific directories such as/mnt/publicand/mnt/private. First we need to create the folders with:1 2
sudo mkdir /mnt/public sudo mkdir /mnt/private

Now, to mount the volume groups we use the command “mount”1
mount /dev/storage_group/public_lv /mnt/public
1
mount /dev/storage_group/public_lv /mnt/rivate
6. Directory Configuration
Creation of structured subdirectories in /mnt/public and /mnt/private to store files based on accessibility.
1
2
3
4
mkdir /mnt/public/uploads
mkdir /mnt/public/downloads
mkdir /mnt/private/personal
mkdir /mnt/private/confidential
7. Security and Permissions
Establishment of appropriate permissions to ensure the security of stored data.
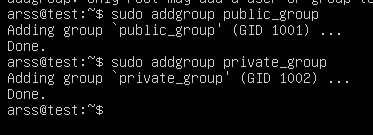
- Creating groups for every folder.
1
2
  sudo addgroup public_group
  sudo addgroup private_group
- Add users to the group
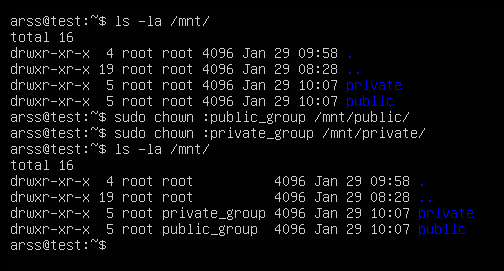
- Change the groups of the public and private folders to their respective groups.
1
2
  sudo chown :public_group /mnt/public
  sudo chown :private_group /mnt/private
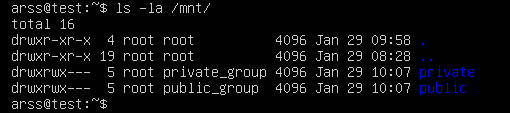
- Change the permissions of the folder.
1
2
  sudo chmod 770 /mnt/public
  sudo chmod 770 /mnt/private
Users are able to create files and folders in those folders, to ensure that every user can edit and write in those files we can type the command1
sudo chmod +s /mnt/publicNow, every file and folder will get the UID that have the parent folder /mnt/public.

8. Testing
Creation and manipulation of test files in designated directories to validate functionality. If I try to create a file with an user that is not in the group an error will be displayed.

9. Automation
Configuration of entries in /etc/fstab for the automatic mounting of logical volumes at system startup.
1
sudo nano /etc/fstab
The fstab should look like this:

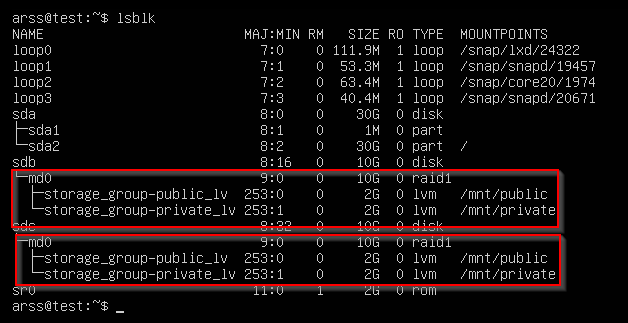
Finally to test if everything worked correctly, we need to restart the VM and check with lsblk if the logic volumes are linked to the folders.